Showing posts with label CASCADE Art Tutorials. Show all posts

Wednesday, February 4, 2026

Sketching Inanimate Objects: Practicing Value and Shading in Small Windows


Sketching Inanimate Objects: Practicing Value and Shading in Small Windows

This short tutorial video was created on a day when I did not have much time—but still wanted to draw.

If you have read my previous blog, Creating Art in Small Windows: Art Practice for Busy Professionals, you already know that I no longer wait for long, uninterrupted hours to make art. Waiting for “free time” often means postponing creativity indefinitely.

Instead, I learned to work within the time I actually have.

This sketching session is one of those moments.


Why I Chose to Sketch Inanimate Objects

For this tutorial, I focused on sketching inanimate objects—simple, everyday items that are easily accessible and familiar.  I used an old jar and positioned it in a way I want to transfer on paper.

Drawing inanimate objects removes pressure.

They do not move. They do not require emotional interpretation or likeness. They allow us to focus on form, light, shadow, and value—the foundations of drawing.

This makes them ideal subjects for short practice sessions, especially when you don't have enough free time.

Understanding Value Through Shading

The heart of this sketching exercise is value—how light and shadow define form.

In the video, I apply different shading techniques such as:

  • Cross-hatching

  • Checking

  • Light and layered strokes

These techniques help us explore how dark and light areas work together to create depth and dimension. More importantly, they train our eyes to observe carefully and our hands to respond patiently.

This kind of practice doesn't require speed, although I have increased the speed by 8X. It requires attention.

What This Sketching Practice Is Really About

This tutorial is not about finishing a perfect drawing.  You will notice that the drawing is not perfect.  Still, its charm is its imperfection.

It is about training the eye, steadying the hand, and building familiarity with value.

When you practice shading—whether through cross-hatching, checking, or simple tonal buildup—you begin to understand how objects exist in space. You learn to see subtle transitions instead of outlines alone.

And when done regularly, even in short windows, this practice strengthens your drawing foundation.

Sketching as a Grounding Practice

For busy professionals, sketching inanimate objects can be deeply grounding.

It requires:

  • Stillness

  • Observation

  • Patience

As you shade, your breathing slows. Your focus narrows. The noise of the day softens.

This is one of the reasons I return to sketching again and again—not just to improve my skill, but to reset.

You Don’t Need to Get It Right

In the video, you will notice pauses, adjustments, and uneven strokes.

That is intentional.

Sketching is a practice, not a performance. Value studies are meant to be explored, layered, corrected, and revisited. Every line teaches the hand something new.

If you are waiting to feel “ready” before practicing shading techniques, you may never begin. Improvement comes through repetition, not before it.

How to Use This Tutorial

You may:

  • Pause the video and follow along

  • Repeat the exercise using different objects

  • Practice for 10, 15, or 30 minutes only

Choose one object. Observe the light. Apply value patiently.

That is enough for the day.

A Gentle Invitation

If you are busy, tired, or creatively disconnected, I invite you to try this:

Choose a simple inanimate object.
Pick up your pencil.
Explore light and shadow without pressure.

Let this tutorial guide you—but let your hand move freely.

Art does not always need intensity.
Sometimes, it only needs presence and consistency.

You are free to share your completed work.  Email it to me using the comment form, and I will see if I can add it to this page.


HAPPY SKETCHING!!!

Friday, August 23, 2024

Oil Pastel Painting: A Beginner's Journey with Curated Video (ROAM lessons 01)

One of my greatest challenges as an aspiring artist is to find time, space, and inspiration to paint. My job takes me to many places and demands a lot of thought to address the needs of my consultancy job. However, as my first love, I find comfort in painting, and I still do my best to explore this borrowed gift. I want to grow and become a professional artist. I paint to express my thoughts and feelings. It is also my way of sharing the talent I believe God has lent me. So, instead of giving up on painting, and as I also have a passion for writing, traveling, and teaching, I decided to bring my art with me. To do that, I need my art materials to travel along with me.

My current mediums are acrylic paint and oil paint. However, bringing a canvas, brushes, and tubes of paints is not always convenient. I learned that oil pastels can be a good medium for producing vibrant paintings. I remember that my first sold painting was done in a hotel way back in 2012. It was my Moon River freehand drawing, which was seen by my fellow consultant, "Ate Kathy." When she saw my drawing, she offered to buy it. I initially offered it as a gift, but she insisted on purchasing it, telling me that it would be the first of many paintings I would sell. She was right! If I count my sold paintings, I can say I have sold more than 30 artworks already, including 10 large paintings, 17 portraits, 7 hand-painted bags, 4 commissioned works, and a few others I cannot remember. I sold Moon River for just PhP 800.00, which included the cost of framing, and the highest price I've sold a painting for is PhP 27,000.00. Though I don't have a regular income flow from art, it's a promising activity that will help me continue with it until I retire.

Title:  Heartstring, oil pastel on Canson paper (sold)

Title:  The Reader Series 2, oil pastel on canvas panel


Title:  My Moon River, oil pastel on drawing paper 

Our First Step to Unlearning and Relearning with Oil Pastels 
Regarding oil pastel painting, I admit I still don’t know much about how to use it. I need to understand and connect with this new medium. So, to make it fun for me and helpful for those who wish to learn about art, come along with me on my journey as I study Oil Pastel Painting. I will share videos and reading lessons in my blog. All I ask is that you share your output by sending it through my page's messenger and comments and share this with those who would like to learn. LET’S ROAM!!!


LESSON 1 -  A Beginner's Guide to Oil Pastels: Exploring the Basics and Techniques

Introduction to Oil Pastels
I like oil pastels because they are a unique and versatile art medium that produces rich, vibrant colors and a smooth application. Unlike soft pastels, oil pastels are made with a non-drying oil and wax binder, giving them a creamy texture ideal for blending.  It is important for beginners to understand the differences between oil pastels and soft pastels because each has its distinct properties and uses.

Essential Supplies
When starting with oil pastels, selecting the right supplies is crucial. As beginners, we can choose from various brands, considering their price and color varieties. High-quality brands may be more expensive but provide better color saturation and blend-ability.  For practice purposes, we may want to start with cheaper one before investing hard-earned money. It's essential to consider the painting surface along with the pastels themselves. Oil pastels can be used on various surfaces, including canvas, wood, glass, and paper. Experimenting with different surfaces can lead to unique textures and effects.  I started with drawing paper, then moved on using Canson paper, and now I also uses canvas.

Basic Techniques
Oil pastels are amazing for exploring different techniques. One of the coolest things you can do is blending, which can be achieved using your fingers, blending stumps, or even oil solvents. It creates smooth color transitions and adds depth to your artwork. Another technique I love is impasto, where you apply thick layers of pastel to create a textured, three-dimensional effect. Also, layering and scratching techniques can add complexity to your piece by building up colors and revealing underlying layers. You may check one of the free lessons I’ve shared using layering of oil pastels in this blog. The possibilities with oil pastels are endless and make the learning process so exciting and rewarding for beginners like me.

Advantages of Oil Pastels
Oil pastels have so many advantages that make them my absolute favorite choice for artwork. I love using them for landscape painting because they blend seamlessly and create such rich, natural tones. Unlike other mediums, oil pastels don't dry out, so I can continuously work on a piece over time without any worries. Plus, they're really easy to clean and I don't need any solvents for cleanup, which makes them so convenient, especially for beginners like me. Another thing I love is that oil pastels are forgiving, so I don't have to be overly precise. I can easily correct mistakes or even incorporate them into the artwork, which gives me the freedom to experiment and be creative without any fear.

Challenges and How to Overcome Them
Oil pastels offer many benefits, but they also present some challenges. One of the main drawbacks is their tendency to smudge, making it tricky to achieve fine details. To tackle this, I can use fixatives to set the pastels in place or adjust my technique to avoid accidental smudging. Another challenge is the difficulty in layering, as the creamy texture can make it hard to apply new layers over existing ones. However, with a light touch and by experimenting with different surfaces, I can build up layers and create depth in my work.

I find oil pastels to be a fun and rewarding medium that provides a wide range of possibilities for both beginners and experienced artists. They are relatively affordable, making art more accessible, and do not require extensive know-how to get started. Although there may be some challenges, such as smudging and layering, I believe that practice and experimentation can help me overcome them. Overall, oil pastels offer a great way for me to explore color, texture, and creativity in my art. Their affordability and ease of use give me the confidence to dive in and start creating.

Here's the video I watched tonight. I'm sharing it because it's not too long, and you'll better understand this medium's characteristics and features. I've also included other reading sources below.


References:
1. Pencils Pens & Pastels for Drawing | George Weil Art Supplies. https://www.georgeweil.com/pastels-pencils-pens-ink/
2. 5 Best Cheap Oil Pastels: Affordable Art Supplies Guide. https://www.art592.com/cheap-oil-pastels/
3. Adobe Fresco Vs Photoshop: Which One Suits Your Design Needs? - ITU Online. https://www.ituonline.com/blogs/adobe-fresco-vs-photoshop/
4. Analysis of an artwork: Mona Lisa by Leonardo da Vinci. https://www.myfirstcanvas.com/post/analysis-of-an-artwork-mona-lisa-by-leonardo-da-vinci
5. How to use Oil Pastels for Beginners | Find Your Art Medium Ep. 8, by Francis Art Studio. https://youtu.be/2seqHHGb7aw?si=JlENUTo4bT-Xk7Qs

Tuesday, August 8, 2023

How to Draw or Sketch Inanimate Objects Easily?

Freehand sketching is a form of drawing that doesn't rely on technical aids or precise measurements. It allows for a more expressive and creative representation of objects and scenes. Here's a step-by-step guide on how to do freehand sketching:

Materials you'll need:

  1. Pencil (preferably an HB or 2B for versatility)
  2. Sketchbook or plain paper
  3. Eraser
  4. Optional: Charcoal or pen for experimenting with different styles

Step-by-step guide:

  1. Observe and choose a subject: Look around your surroundings or find a reference image or object to sketch. Start with simple objects or scenes when you're just beginning.
  2. Warm-up exercises: Before diving into your main sketch, do warm-up exercises to sync your hand and mind. Try drawing circles, straight lines, curves, and squiggles to loosen up your wrist.
  3. Basic shapes and proportions: Start by blocking the basic outlines of your subject. Use simple geometric forms like circles, ovals, rectangles, or triangles to represent different subject elements. Pay attention to the proportions and relationships between these shapes.
  4. Light lines: Begin sketching with light, faint streaks. Avoid pressing too hard on the pencil to make it easier to adjust and refine your sketch later.
  5. Contour lines: Focus on the outlines or contours of your subject. Follow the edges and curves to define the shape. Remember, you're not aiming for perfection, so don't fear imperfections or mistakes.
  6. Details and shading: Add more details to your sketch once you have the basic outline. Observe the shadows and highlights to add depth and dimension to your drawing. Use hatching (parallel lines), cross-hatching (overlapping lines), or stippling (dots) to create different shading effects.
  7. Keep it loose and expressive: Embrace the imperfections and variations in your sketch. Freehand drawing is about capturing the essence and feel of the subject rather than creating a perfect replica.
  8. Practice regularly: Freehand sketching, like any skill, improves with practice. Set aside time each day or week to draw different subjects and experiment with various techniques.
  9. Learn from others: Study the works of other artists and sketchers. Watch tutorials, read books on sketching, and attend workshops to learn new techniques and gather inspiration.
  10. Be patient and have fun: Don't be too hard on yourself if your sketches don't turn out as you imagined. Keep experimenting, exploring, and enjoying the process of freehand sketching.


Remember, the beauty of freehand sketching lies in its spontaneity and individuality. Let your style and creativity shine through, and don't be afraid to make mistakes. Happy sketching!

Thursday, May 18, 2023

Free online lesson on Oil Pastel Drawing - Saturday Art Class excerpts

Last 22 April 2023, we had a face-to-face online class at my Cascade Art Studio in Project 4, Quezon City. The medium we used was oil pastel. This medium is cheaper than oil paint, easier to manage by children, and for art experts, it can be very versatile if we learn how to manage its use.

CASCADE's Saturday Art Classes are affordable classes on art for children and adults. We offer PHP 350 per participant for a two (2) days-2 hours session on Saturdays. I have a regular job and still wish to share my talent in art by holding these art classes at home. Art classes are expensive, not to mention the prices of art materials. But Art Classes can be of big help to individuals to improve their focus and divert unwanted thoughts. It can also be self-expression or a form of mental health exercise.

Today, I am sharing an excerpt from our Saturday Art Classes. We hope you'll get inspired by this, and if you wish to join our Saturday Art Classes, feel free to message me using the links in this blog or at my FB Account: CASCADE Art Studio.


We also encourage you to share your work through the comment box. You may also send a direct message. I will feature your work in our blog.


You may also visit my YouTube for the next featured video:  https://youtu.be/uLn2DYmrh1s

Saturday, October 22, 2022

AFFORDABLE SATURDAY ART CLASSES - MEET OUR CASCADE KIDS

I woke up excited this Saturday morning as this would be the very 1st Face-to-Face Saturday Art Classes that we will have since 2019.  We were supposed to launch the 1st class on March 2019, but pandemic occur.  We were not able to launch our school and the author just continued developing programs and learning materials for our website.  You will find useful lessons through our Free Art Lesson tab.  
Learning on your own, without a mentor or someone to critique your work is difficult.  As a learner, you would appreciate the guidance of an art teacher.  Though art maybe innate for our children, having a teacher speeds up the process of learning.
We always wanted to develop the skills of children and adults in creative arts.  But many of the offered classes are quite expensive.  And so we tried to trim down the cost of having a class by taping our friends to share their abode as venue for classes.  Luckily, Ms. Leslie Esternon helped us by opening her doors for our learners.  
The families or the parents will also spend more buying art materials.  But as a learned artist, we know that it is very essential to understand our materials first before we buy expensive branded products when we can secure less expensive art materials through bulk orders.  This is one of our strategies to lower the cost of the classes.  Thus, as part of our two-days session, we already added the handouts, drawing materials and the 2-days workshop session at Leslie's place.  
The first live class started on October 22, 2022, 2 p.m. until 4 p.m.  We had 10 students, four of which are teenagers and six are from age 8 to 10 years old.  The younger children are guided by Ate Rose and the teens are guided by Lolo Rey.  It was fun and they were given assignments so that they will be able to learn practice what they learned.  Here are some of the shots for the 1st day...


Tuesday, August 30, 2022

FREE ART LESSON #7: Portraiture or drawing faces: Freehand Drawing (Simple and Easy to follow steps)

 We had a three-day vacation last Saturday until Monday (August 27 to 29, 2022).  We went to a place where there's no data or wifi, and the cottage that we rented have no TV programs.  What we have are open cabanas, videoke, and a large pool.  We indeed enjoyed our stay and was able to relax because there's no internet that would occupy us, so we spent so much time bonding with family members.

This was my output during the said outing

Whenever I don't feel like swimming, I spent time doing freehand drawing.  And so our topic for today, is how you can draw a portrait, without having rulers, or grid lines but just a reference.  This approach is a freehand drawing.  Usually, if there are no scales, it is quite difficult to find where to place the parts of a face.  But with this simple guide of using circles, and shapes, you'll find it easy to draw faces.  


I have included a video at the latter part of this article.  I promised the video owner, https://www.youtube.com/c/ChommangDrawing, that I'll acknowledge him.  Check out his channel and you'll get useful tutorials on drawing.

STEP-BY-STEP INSTRUCTION ON DRAWING FACES

This will be our reference photo:


   Step 1:  First, draw a circle, which is our guide for the upper portion of the face.  If you will visualize a skull, the upper part of the head is spherical in shape. 


 Step 2:  Now find the location of eyes, nose and lips.  Cut horizontally the circle by placing a very light line.  This will be the upper lid of the eyes or where you place the brows.  If your reference picture is looking sideways, about 45 degrees, then the vertical line guide for the nose would be about 1/3 of the circle.  Draw two smaller circles for the eyes socket and a slim pear-shaped for the nose.  Take note, the end of the nose may be very close to the lower outline of the circle. 


Draw the lower shape of the face, which is the chin.  The mid line of this shape would be the place for the mouth.  Draw a line at the mouth's opening, and the upper lip and lower lip to follow.  

You may now proceed with erasing some parts of the head that you feel is not needed; determine now the exact shape of the face by outlining with heavier marks.
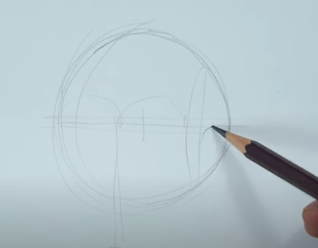
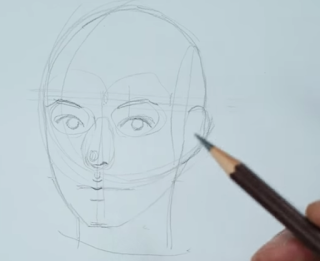
 Since one ear is showing, draw its outline.  Usually, the upper part of the ear starts under the brows and ends at the end of the nose.


Step 3:  Proceed with detailing.  Draw the eyes as to how you see it.  Followed by the nose and lips.  If you are distracted with the references, you can erase it as soon as you are able to achieve the exact shapes and details of the face.


 It is not necessary that you follow the guidelines as you draw.  If you feel that there are slight changes to make it look exactly as the photo, do change the parts.  It is advisable that you draw using light stroke first before you finalized the lines or parts of your drawing.

 For the hair, find the center where the hair parted.  Usually, the hair flows out of the sphere borders.  Use curves as to how the hair flows out.  Do not shade it yet.

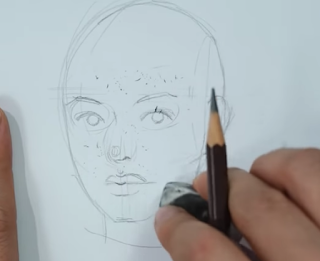
 When you are able to fine the details, you may now use darker and heavier strokes for finishing the face outlines.


Step 4:  Shading - Now that you see how the face appears, erase all sketches or guides and clean up the face.  Then shades the eyes, lips, hair and other shadows.  Get the exact hue of shades so as to develop a 3D appearance or to put life to your drawing.  Highlights can be achieved by lifting out shades using your eraser.


Watch the video below to see how it's being done by the artist.  We hope you learned from this free tutorial.  Please like or follow and share to your friends.  


Saturday, June 11, 2022

It's S-ART-urday!!! (Basic requirements in painting - Brushes)

Hello young artists, art enthusiasts, fellow artists and art aspirants.  I hope you are looking forward to another creative Saturday Art activity.

I have to work on two (2) paintings, one commissioned and the other is already purchased.  I just wanted to improve the latest before delivery to its new home.   I started cleaning my corner studio (because it is just a mini space in our garage) and got inspired by a hashtag I've thought of at the spur of the moment ---  it is #sARTurday.


WELCOME TO MY MICRO-STUDIO! 😝

As many of my friends know, I have a regular work from Monday to Friday and it's only during weekends and holidays that I get to do my painting.  Since the pandemic, I was not able to devout time building on the first initiative that we started when we had our CartWheel exhibit.  Now that the pandemic has been lifted, I see hope to continue this endeavor so that we can share our talents.

So now, every Saturday, we will have art moments.  Maybe I can start sharing lessons learned every Saturday, and how I pursue my art interest.  If you wish to join me, you can subscribe to my blog and you'll receive updates below.  We can also have 30 minutes #sARTurday sessions or art classes via zoom.  I'll prepare my studio, the lessons and the time so that it'll be at the most convenient time.  We invite Filipino children, as the medium of our classes would be in "Filipino" or "Tagalog".  Are you joining?  If yes, please send me a message using the "contact form for inquiries" found at the bottom of this page.

I am continuously learning as an artist.  I watch videos that would help me improve.  For today, let me  share this video by Kevin Hill, which I think would be helpful in starting up as an acrylic painter.  Then later, I will share as well what I did so that you can apply it at a smaller scale.  You've already seen my studio above as I shared with you my space which serves as my studio, my collection of brushes, and acrylic paints.  You don't need a large area to become an artist.  We need our hearts to be bigger that our excuses.  

If you don't have adequate time to complete this video, you may click on the timestamp below to watch where you left at.  

1:17 oils vs acrylics - 3:40 Difference in bristles - 5:20 Easels - 6:30 Palettes - 7:34 Colors explained - 8:55 Spending time learning - 9:35 How to setup - 11:40 plein air painting - 12:00 Cleaning - 14:45 Mediums - 17:28 Varnish - 18:02 Palette knife - 18:19 Underpainting techniques - 19:05 Sketching - 19:50 acrylic over oil paint - 20:30 Canvases - 23:43 Not making mud - 25:20 Complementary colors & warm & cool colors colors - 26:58 Color mixing practice - 28:00 mistakes - 29:10 painting ideas - 30:27 perspective - 31:35 selling paintings - 32:50 the biggest challenge


ACRYLIC BRUSHES

At 3:40 of the video above, we have seen the different bristles. Let me share the brushes I use in doing acrylic painting.

Flat Blender Brush

I uses this flat blender brush for layering and blending soft acrylic paints.  Sometimes, keeping it dry, I uses it for softening top paint and for glossing mists and fogs in landscape painting. 
Flat Brushes
There are two (2) kinds of flat brushes I use.  One is with soft bristle and the one on top is with stiff bristle.  I uses this to create natural textured paint on landscapes or still life.  You can use these in spreading, and tapping paint on canvas.  Sometimes I uses the one above as dry brush for blending acrylic colors.

Pointed Rounded Brush

These brushes are ideal for creating petals, leaves, and even fine edges for trees or houses.  It stores a lot of paint on its bristles, thus ideal for tapping and pulling paint over the canvas.

Fan Brush

I have two (2) different sizes of fan brushes.  When working on large paintings, I uses the larger one.  But most of the time, I uses the smaller one.  Usually, I uses these for creating textured grasses.  It is originally designed to create texture.  However, when it is too wet, it clumps together.  Just ready a rag to wipe out excessive liquid when clumping happens.


Angled Filbert Brush

These brushes are suited to create close-up tree leaves, flowers, tall grasses, tree limbs, etc. Its angled bristles can be used to create many different angles, for almost endless brush stroke possibilities. 

Mop brush (black fibre) and stiff flat brush (green)

The Mop brush has larger bristles with a rounded edge for broad soft paint application as well as for getting thinner glazes over existing drying layers of paint.  By using this, it will not damage the lower layers of paint.  The flat stiff brush is ideal for creating thinner lines when run using the thinner side, or larger flat spread of paint.


Micro fiber filbert brushes

These are the smallest fibre brushes which I use for detailing.  These are perfect for final touches, example detailing close up tree leaves to flowers, seascapes and just about anything else. 

Custom Liner

The custom liner creates fine lines.  I usually use these when creating barks or branches of tree or pulling lines to create benches, walls, or just anything.  It carries a lot of paint and doesn't splatter when used.


Watch this to see how brushes are used.


Did you learn something today?  I hope you did!  Please do share your thoughts and keep our passion burning! 
    Rose Gob


About Rose Gob

My photo
Welcome to my blog! I’m Rose Gob—an expert in Knowledge Management, a seasoned HR and OD practitioner, an ARTIST, and an educator. I’ve created three dynamic blogs to share my deep passion for creative arts, cooperatives, and the social enterprise industry, with a primary focus on my art blog, www.cascadeartstudio.com. Throughout the pandemic, I explored a variety of topics, but now I’m excited to bring you more focused and engaging content. I want to hear from you! Share your thoughts, ask questions, and let me know what topics you're eager to dive into. Thank you for stopping by. Your insights are invaluable to me. Please be sure to check back often, and have an amazing day!